WaterRower A1/GX Preventative Maintenance
&
Troubleshooting Guide
Preventative Maintenance
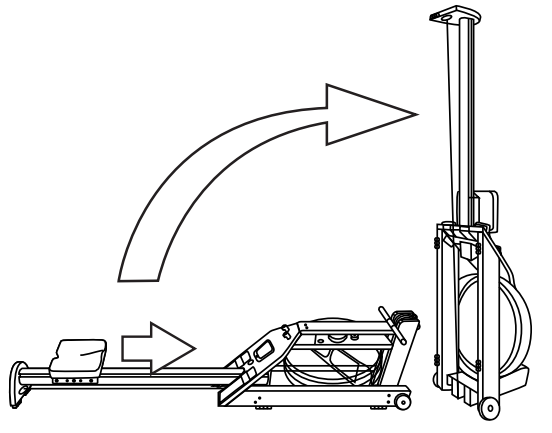
The WaterRower can be stored upright. To do so, lift the end of the rower and move the WaterRower on the front wheels to the area of storage.
Please note, when standing your unit upright, slide the seat forward towards the footboard prior to lifting the rower.
Cleaning
Wipe down handle, seat and frame of monorail after every row.
Dust Build Up
Dust tank and belts regularly.
Clean the inside groove of the monorail where the wheels run.
To do this, run a damp cloth with your finger up and down the inside of the groove. This will clean out the oxide (fine powder), dirt, dust, etc. which builds up with use.
Loose Bolts

Each week, inspect the bolts along the tank assembly and rail assembly to ensure they are all secure in the frame of the rower. If necessary, use a 5mm allen key to tighten any bolts that have come loose.
Weekly Belt Alignment and Monitor Test

On a weekly basis, check the alignment of the recoil belt; it can, sometimes, come misaligned on the front pulleys (see picture). If the recoil belt is off a pulley, the recoil of the handle will be sluggish and not feel smooth. It can also lead to fraying of the belt. Check the recoil belt is aligned and runs over each pulley correctly and smoothly as seen in the second picture.
Clean Seat Wheels

1. Stand the unit up and unclip the bungee cord from the recoil strap.

2. Using the 5mm Allen key, remove the 2 vertically positioned bolts holding the rear leg onto the monorail.

3. Slide out the rubber rail stoppers and remove the seat from the rail.

4. Clean each wheel with a cloth. While the seat is removed, using a damp cloth or small roller brush, clean out the groove on the monorail.
Check the Tension of the Recoil

To test the strength of the recoil, lift the handle out of the handle rests and release the handle so it slides along the top deck, towards the forward riser pulley. The handle should slide smoothly and quickly all the way to the front.
Water Condition

Purification tablets should be included in your Owner’s Pack or the WaterRower GX Maintenance Kit. We recommend adding 1 tablet to the water every 6 months. If the water turns cloudy and does not clear when adding the tablet, it may be best to change out the water. Please use the hand syphon pump and refer to our service website at www.waterrowerservice.com on how to remove and add the water.
*Note: If you use the blue dye in your tank, it is not recommended that you use the purification tablets. Discoloration may occur if you do so. Instead, please visually monitor water quality and change when necessary. It is recommended that dyed water is changed out every year.
Oil Wood

As with any furniture, wood needs to be oiled to keep its luster and shine. With changes in temperature and humidity, the wood can dry out. We recommend using Danish Oil to maintain the wood.
Tank Stopper

The tank stopper can fall out, on occasion, and you will need to reinsert it into position. You may need to moisten the tank stopper to help with putting it back into position.
Handle Strap

Every 6 months, review the stitching and wear on the handle strap. If you notice excessive wear, replace the handle. Fraying can be caused by incorrect use. Please see instructions on our service site for replacing the handle.
Replace the Batteries

If the monitor readings begin to fade or are incorrect, we recommend changing the batteries. 2 AA batteries are located behind the monitor. Using a Phillips screwdriver, unscrew the 2 screws, one on top and one on bottom of the monitor, and gently lift to access the battery pack located behind the monitor. (Please note: the monitor is connected to a sensor wire and pulling too hard may cause damage). Replace the batteries and reattach the screws to the footboard. Check the batteries are positioned correctly in the battery pack and the connection between the monitor and sensor has not come apart.
Replace the Bungee

Over time, and with use, the bungee cord can lose its elasticity, which will affect the recoil of the machine. If this happens, it should to be replaced. To do this, remove the two horizontally positioned bolts with the 5mm allen key from the bungee pod. You may need to put pressure on the JCNs on the outside of the rear leg to remove the bolts completely.

Remove the old bungee assembly and position the new one into place on the rear leg. Replace the JCNs (on the outside of the leg) and the bolts (on the inside) and tighten. Again, you may need to put pressure on the JCNs in order to completely tighten the bolts.
Troubleshooting Guide
Monitor Turns On but Does Not Start

1. Refer to Step 3 in the Assembly Manual to make sure the sensor cable has been attached to the monitor cable.

2. Check the position of the sensor underneath the top deck; the sensor sits in a groove and hangs down above the sensor disk. The sensor should hang approximately 3mm above the magnets in the sensor disk.

3. If the sensor is a little too far away, try to tighten down the top deck bolts. Alternatively, check that the wiring on both the monitor and sensor cable is intact. Make sure the wires have not been caught behind the footboard during the assembly process.
If the monitor does not turn on, it could mean the batteries are faulty and need to be replaced.
If the monitor does not turn on after replacing the batteries or there is a break in the wires,
contact you nearest WaterRower office or email [email protected] for replacement parts.
If the monitor screen is frozen, statistics stay the same or if the monitor does not turn off, remove
the batteries for 10 seconds and replace the batteries. If the probelm persists, contact your nearest
WaterRower office or email: [email protected].
Tank Paddle is Rubbing

With the 5mm Allen key, loosen all the bolts (in the order of: 1, 2, 3, 4, and 5) on the tank assembly. Take a few gentle pulls to see if rubbing continues. If rubbing has stopped, gently retighten the bolts in the same order.
If this does not solve the problem, determine where the paddle is rubbing in the tank: right side/left side, top/bottom or front/back of the tank. Please refer to the Troubleshooting section on our Service website www.waterrowerservice.com, or contact your nearest WaterRower office. You can email: [email protected].
Sluggish Recoil

Firstly, check the belt alignment and make sure all straps are positioned correctly on the pulleys.
Secondly, when the handle is in its full forward position, check the recoil belt it is wound 1½ times around the shaft of the paddle underneath the clutch.

Thirdly, shorten the recoil strap by readjusting the strap in the buckle. Be careful not to make the recoil belt too short. Replace the bungee cord if necessary. Please contact [email protected] or call your nearest WaterRower office to order a new bungee.
If the seat does not slide smoothly with first use, sit and slide the seat up and down for 5-10 minutes for the wheels to settle in. If after 10 minutes the seat still does not slide smoothly, check the monorail is clean and free from obstruction. If the problem persists, please contact your nearest WaterRower office or email [email protected]. If the seat feels rough, clean the monorail and the seat wheels.
If the water begins to turn cloudy, add in one purification tablet. If after two weeks the water has not cleared, drain the water from the tank, fill the tank with fresh water and add in a purification tablet.
When taking the first few pulls on your rower, the only sound you should hear is the swishing of the water. If there are any other sounds, please determine where the sound is coming from and contact your nearest WaterRower office (details on back page).

First check the level of water is not filled above the maximum level. Please refer to the level gauge sticker underneath the tank. If the tank is filled to the correct level, determine where the water is coming out of the tank and contact your nearest WaterRower office or email [email protected]