Series 3 Service Instructions

Series 3: Forward Riser Replacement

For Video Instructions, please see the following link:
Replacing the Forward Riser Assembly

Step 1- Remove handle assembly (see handle removal replacement instructions)

Step 2- Remove Recoil Belt (see recoil belt replacement instructions)

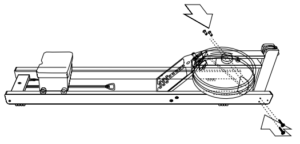
Step 3- Remove Tie Rod bolts as shown.

Step 2 - Top Deck Replacement

Step 4- Remove the fasteners connecting the forward riser bottom bracket to the side rails as shown.

Step 2 - Top Deck Replacement

Step 5- Remove the forward riser assembly from the tank assembly as shown.

Step 2 - Top Deck Replacement

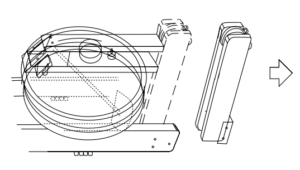
Step 6- Replace the forward riser assembly against the tank assembly and between the rails as shown.

Step 2 - Top Deck Replacement

Step 7- Replace the Tie Rod bolts as shown. Ensure that the cross dowels into which the Tie Rod bolts screw are aligned with the Tie Rods. To do this use a screwdriver to ensure that the cross dowel slot is in line with the cross dowel as shown.

Step 2 - Top Deck Replacement

Step 8- Fasten the forward riser bottom bracket to the side rails as shown.

Step 2 - Top Deck Replacement

Step 9- Replace the handle assembly (see handle replacement instructions)

Step 10- Replace the Recoil Belt (see recoil belt replacement instructions)

Related Articles

  • Series 3: Rubber Feet Replacement

    Step 1- Locate the two sets of indentation guides on the bottom of the wooden rail. A:The rear rubber feet indentations are approximately 3 1/2” from the back of each...

  • M1: Extrusion Replacement

    Step 1.  With the 5mm Allen key, unscrew the seat stops. There are two on the front and back of each rail. Step 2.  Peel the old extrusion off the...

  • M1: Handle Replacement (plastic clutch)

    For Video Instructions, click here: Replacing the Handle Assembly (Plastic – Bolt On)   Step 1- Remove the handle from the handle rests and place it in the full forward...

  • S1: Handle Replacement (plastic clutch)

    For Video Instructions, click here: Replacing the Handle Assembly (Plastic – Bolt On)   Step 1- Remove the handle from the handle rests and place it in the full forward...