M1 Monitor Service Instructions

M1: Monitor Housing Replacement

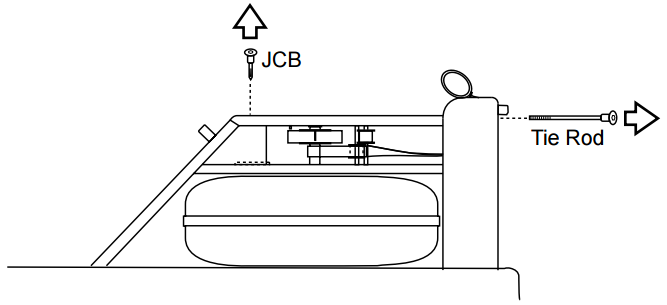
Step 1.  Remove the tie rods and JCB bolts connecting the top deck to the tank assembly as shown.

Step 2– Remove the top deck assemble as shown, being careful not to dislodge the guide pulleys.

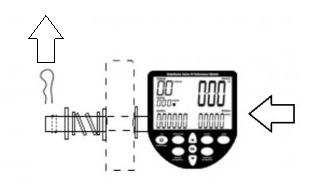
Step 3– Disconnect the Sensor Connector. Remove the old monitor retaining pin and remove the old monitor from the key bracket as shown.

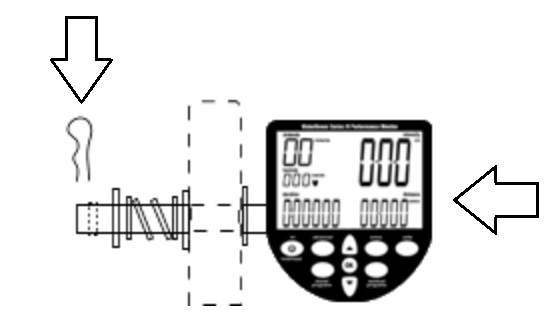
Step 4– Position the S4 monitor assembly through the right key bracket as shown. Ensure that the spring and washer orientation is correct. The washer should be placed after the spring is in place on the tube. Replace the R pin retaining the monitor assembly as shown. Reconnect the Sensor Connector.

Step 5– Replace the top deck as shown.

Footstrap_Replacement-04

Step 6– Replace the JCB bolts and tie rods connecting the top deck to the tank assembly as shown. Ensure that the tie rod cross dowel slots are aligned with the tie rod. You may utilize a screw driver to assist this.

Footstrap_Replacement-04

Related Articles

  • M1: Extrusion Replacement

    Step 1.  With the 5mm Allen key, unscrew the seat stops. There are two on the front and back of each rail. Step 2.  Peel the old extrusion off the...

  • Series 4: Monitor Sensor Disk Replacement

    Sensor Disk Replacement: View a video for this Step 1– Remove the Handle from the handle rests and place the handle in the full forward position as shown.   Step 2- Stand...

  • S1: Handle Replacement (metal clutch)

    For Video Instructions, click here: Replacing the Handle Assembly (Metal/Velcro attachment) Step 1- Remove the Handle from the handle rests and place the handle in the full forward position Step...

  • M1: Recoil Belt Replacement (Clip on Recoil)

    For Video Instructions, click here: Replacing the Recoil Belt Step 1- Remove the handle from the handle rests and place the handle in the full forward position Step 2- Stand...