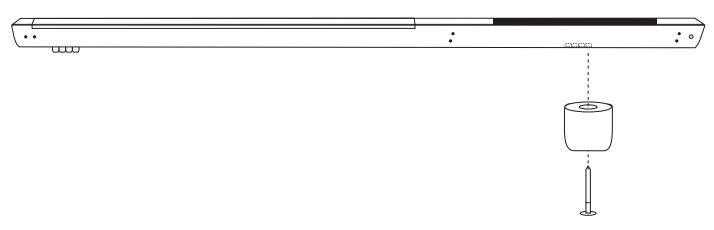
Step 1- Locate the two sets of indentation guides on the bottom of the wooden rail.
A:The rear rubber feet indentations are approximately 3 1/2” from the back of each rail.
B:The front rubber feet indentations are approximately 13” from the front of each rail.

Step 2- Start at the rear of the rail and attach first of four rear rubber feet. Firmly place foot and wood screw into position and tighten with a Phillips head screwdriver. Tighten until foot is fully secure [can no longer rotate by hand].
Attach 2nd, 3rd, and 4th feet in a similar manner, while ensuring each one is flush with neighboring foot/feet.

Step 3- Continue to the front of the rail and attach first of four front rubber feet.
Firmly place foot and wood screw into position and tighten with a Phillips head screwdriver. Tighten until foot is fully secure [can no longer rotate by hand]. Attach 2nd, 3rd, and 4th feet in a similar manner, while ensuring each one is flush with neighboring foot/feet.
Step 4- Follow your assembly instructions to attach rail to rower.