Monitor Series 3 Service Instructions

Series 3: Monitor Board Replacement

Step 1.  Remove screws (4) fastening the monitor facia to the monitor backplate as shown.

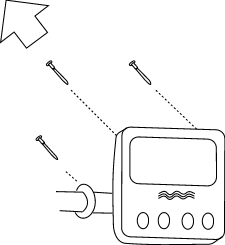
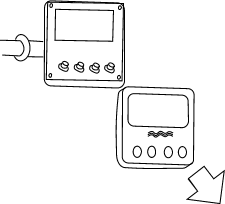
Step 2. Remove the Facia Assembly as shown.

Step 3.  Remove monitor circuit board as shown.

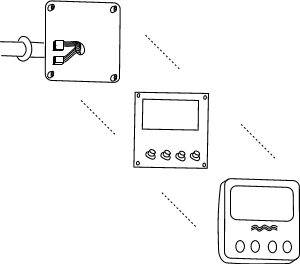
Step 4.  Replace monitor circuit board as shown. Be careful to ensure that you place the socket on the correct header (i.e. five pin to five pin and four pin to four pin). Also be careful to ensure that the socket is orientated correctly. They sockets and headers are designed only fit in one direction, if enough force is applied however then it is possible to fit them incorrectly. Look at the arrangement, it should be obvious which is the right and which is the wrong way. Typically the wires should face the circuit board.

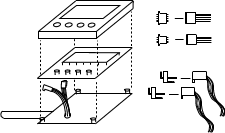
Step 5.  Replace facia assembly as shown.

Step 6. Replace screws (4) fastening the monitor facia to the monitor backplate as shown.

Related Articles

  • M1: Handle replacement (metal clutch)

    For Video Instructions, click here: Replacing the Handle Assembly (Metal/Velcro attachment) Step 1. Remove the Handle from the handle rests and place the handle in the full forward position Step 2. Stand...

  • Series 2: Double Bungee Replacement

    Step 1.  Remove the Handle from the handle rests and place the handle in the full forward position. Step 2.  Stand the WaterRower upright and disconnect the bungee from the...

  • Series 3: Dolley Wheel Replacement

    Step 1- Assemble the Dolley Wheel to the rail in the sequence shown.

  • Series 3: Level Gauge Location

    The Level Gauge sticker on all Series 4 (S4) model WaterRower units, is located on the side of the tank under the tank stopper.   The Level Gauge sticker on...